The Pyro Oxygen Logger software is delivered from PyroScience (Denmark) and is the compatible software to the FireStingO2 optical oxygen meter. Here you will find general descriptions for the software for settings, calibrations and measurements.
First, let's get to know the interface of the software to measure oxygen.
Screen shot of the Pyro Oxygen Logger software.
1) Chart recorder displaying sensor outputs.
2) The sensor-output from Channel 1-4.
3) An overview of all channels together in one chart recorder.
4) The channels are activated in the 'Settings'. Go through settings prior to calibration.
5) Before the experiment starts, the calibration of all channels must be performed.
6) After calibration, the sensor-output is logged into a file to save the data. Press 'start' to create a data file.
7) Start/stop measurement (logging to file) by clicking on the measurement start/stop button. The green triangle indicates measurements in progress.

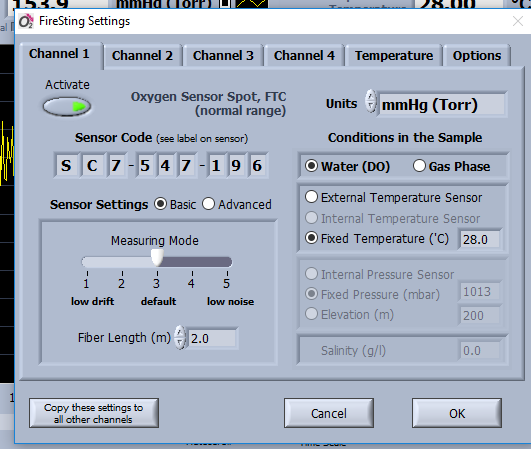
When starting the software, a Settings dialogue window pops up. Here you define the 1)sensor code 2)sensor settings and 3) the environmental conditions during the study for each channel.
The sensor code is specific for the sensor type and each vial. Identical respirometer vials of the same size have often the same sensor code, but respirometer vials of unequal sizes have different sensor codes. The unit for dissolved oxygen can be selected in a drop-down meny. Selectable units include ml/L, μmol/L, hPa (mbar) and mmHg (Torr).
Sensor settings include information regarding the optic fibre length and background noise.
The environmental conditions are defined by:
- Water (DO)/Gas phase - the condition in the respirometer vials.
- External temperature sensor/Fixed temperature - the temperature of the samples. If the respirometer vials are incubated in a water bath, the temperature is kept stable and the fixed temperature is chosen. However, if you expect to have a temperature variation (+/- 0.1-degree Celsius or more), the temperature is measured using a temperature sensor connected to the FireStingO2.
- Internal pressure sensor/fixed pressure/elevation - Choose internal pressure sensor since respirometer vials have integrated internal pressure sensor in the sensor stripe.
- Salinity
Before starting the calibration, ensure that the correct sensor code has been entered in the settings!
Click on the Calibration to open a dialogue window to calibrate the channel. Different standard modes can be chosen for the calibration.
Choose 1-point in water or humid air to do o% calibration value using the sensor code and the air calibration value from a manual setting of temperature in air-saturated water. As the oxygen content (% O2) stabilizes (steady state), click the Set air and the actual oxygen sensor reading is taken for the air calibration.
Click on Finish for returning to the main window.

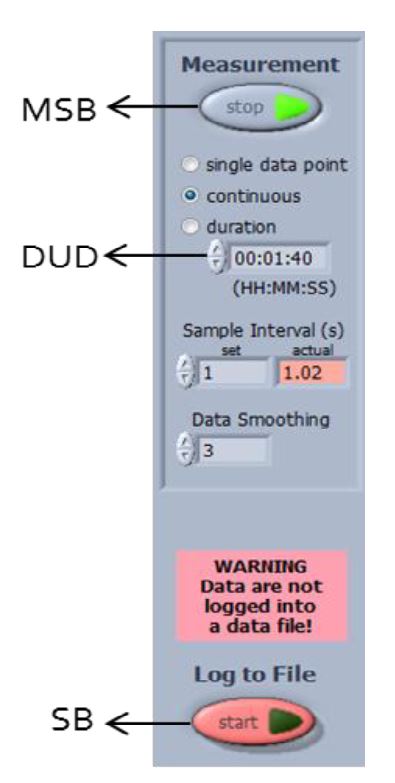
A Measurement is started by clicking on the MSB on the right side of the software interface. Chose the mode for measurement (single data point/continuous/duration adjusted with the duration display DUD).
To save the data into a file, press SB. This will open a new window where you save the data file (.txt-format) and all measurements will be logged into this file.